「アレクサ、部屋の温度を教えて」を実現のための第6歩になります。参考にしたのはこのブログです。Alexaとの対話までできました。
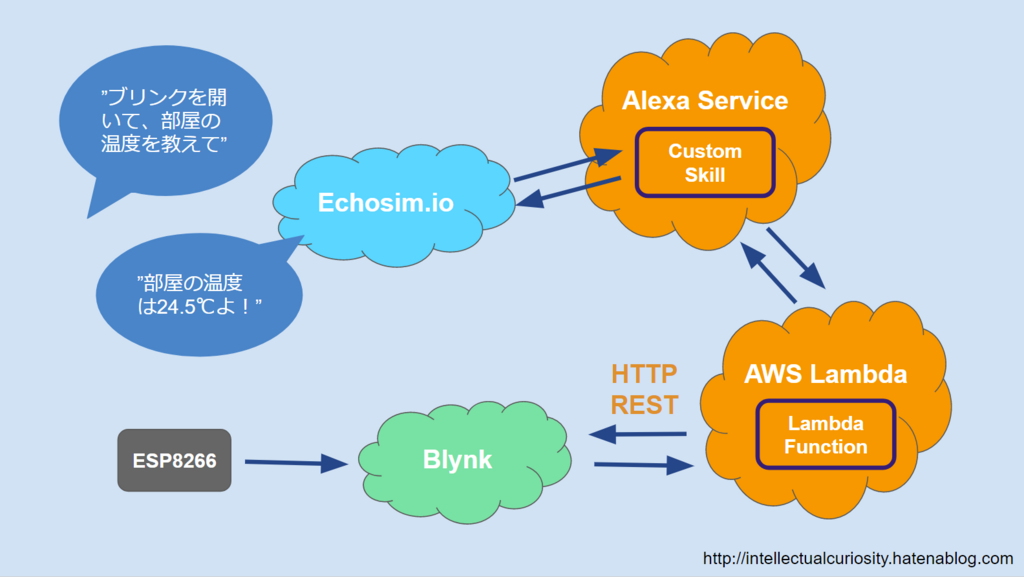
ツンデレキャラでWiFi温湿度計(ESP8266 + Blynk)の値を教えてくれるAlexaスキルを作ってみた - 知的好奇心 for IoT
AlexaやGoogle Asistantに指示を出して機器をコントロールすることは行いましたので、今度は機器から情報を受け取って音声アシスタントから教えてもらうことに挑戦しました。
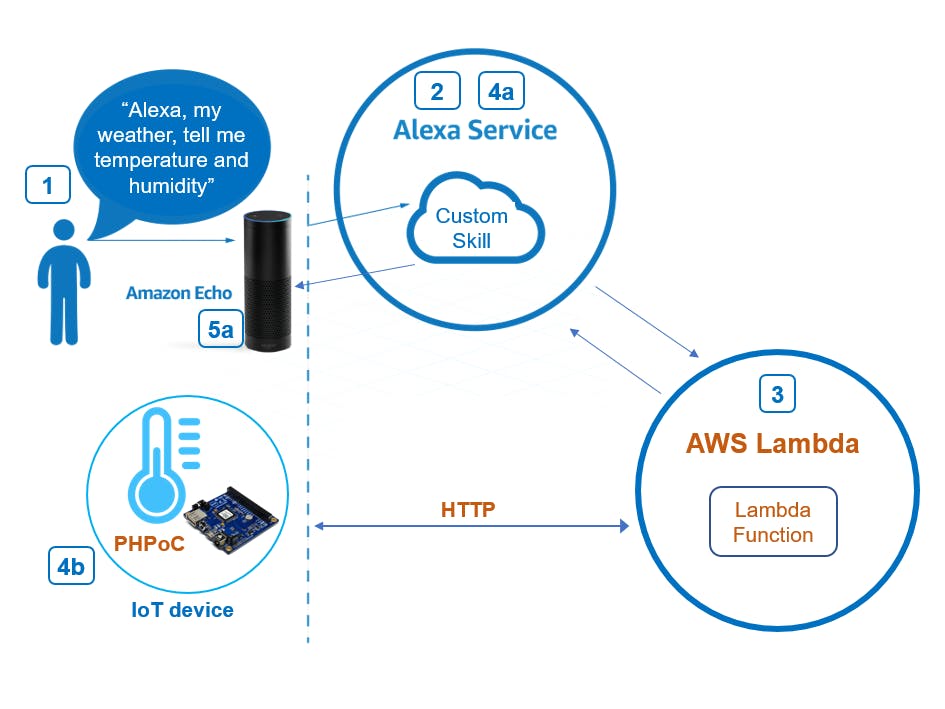
Amazon Echo ? Read Temperature and Humidity from Sensor
I am going to show how to use Amazon Echo to read temperature and humidity from sensor. By phpoc_man and Jasmine Kang.
 www.hackster.io
表題のAlexa skillとは、「アレクサ、部屋の温度を教えて」「部屋の温度は20度です。」などといったアレクサとの対話スキルのことです。
会話を成り立たせるには、ESP8266から温度データを読み出す(I)Lambda関数と、そのLambda関数を呼び出すための (II)Alexa Skillが必要です。

Alexa Skills Kit
Alexa Skills Kitとは??Alexa Skills Kit(ASK)は、スキルと呼ばれるコンテンツを作成するためのソフトウェア開発フレームワークです。スキルは、Alexa用のアプリのようなものです。Alexaの対話型音声インターフェースにより、ユーザーはハンズフリーでスキルと対話できます。(中略)たとえば、ユーザーはAlexaに、照明をつけたり、サーモスタットの設定を変更したりするよう頼むことができます。スキルは、AmazonのAmazon EchoやAmazon Fire TVを始め、ほかのメーカーのAlexa搭載デバイスでも利用できます。引用元:Alexa Skills Kitとは?
スキル開発にでてくる基本的な用語を説明します。起動ワードAlexaに指令を出す前に必要な呼びかけ。Siriでいうところの「Hey Siri」。シミュレータで試すときには不必要。選ばれし者(実機を買えた人)は本体設定で、「アレクサ」「アマゾン」「コンピュータ」「エコー」から選択可能。※ 「エコー」も選択可能ということを選ばれし者に教えていただきました。 [12月7日12:00 追記]スキルの呼び出し名スキルを呼び出すときの呼び方。スキル名と異なっていてもOK。インテントユーザーの音声によるリクエストを満たすアクション。メソッドのようなものだと思って頂ければ。スロットインテントに渡す引数。(今回は登場せず)サンプル発話インテントを呼び出すためのフレーズ。1つのインテントに複数のサンプル発話を登録可能。引用元:日本語のAlexaスキルの作り方(30分あればAmazon Echoがなくても試せるよ)
Alexa Skill作成手順
alexa developer consoleへログイン
alexa developer console へ行き、「スキルの作成」を押します。(amazom.co.jpのアカウントでのログインが必要です。よくハマるみたいです。)

新しいスキルを作成
- スキル名を入力します。
- スキルに追加するモデルを選択;デフォルトの「カスタム」を選択します。
- スキルのバックエンドリソースをホスティングする方法を選択;デフォルトの「Alexa-Hosted (Node.js)」を選択します。
- 「スキルの作成」を押す。


- スキルに追加するテンプレートを選択するのですが、Hello Worldスキルがデフォルトのようなので、そのまま「テンプレートで続ける」を押します。内容はあとから修正できますので、気にしないで進めました。

- しばらく待つと、下記の画面になりスキルの基本形は完成しています。(スキル ビルダーのチェックリストは全て?済み。)
- これを基にして、スキルを組み立てます。

スキルの組立
「呼び出し名」を決めます。
スキルの「呼び出し名」とは、スキルを最初に呼び出すとき、「アレクサ、○○○を開いて」という○○○のことです。

インテントを作ります。
インテントとは、ユーザーの音声によるリクエストを満たすアクションのことです。たとえば、「部屋の温度を教えて」です。

- 「カスタムインテントを作成」をクリックすると、インテントを書込みする画面になります。

- サンプル発話
「このインテントの呼び出しに使われると考えられる発話」のところに、その直下にある「GetMeasurement {Location} の {Measurement} を教えて」などと書いて、右の「+」をクリックします。
色々な言い回しで、複数のサンプル発話を作ることができます。

- スロットのタイプ
場所(location)と測定項目(Measurement)は、カスタムスロットで定義します。

スロットのタイプの画面で、「+スロットタイプ」を押すと、カスタムスロットの作成画面に代わるので、名前を入れて「Next」を押します。それぞれのスロット値を適時書いていきます。
ここでは、「LIST_OF_LOCATIONS」と「LIST_OF_MEASUREMENTS」を作りました。

ひとまずここまで

Lambda関数を作る
AWS lambda ログイン

AWSマネージメントコンソール
お客様は、続行することにより、AWS カスタマーアグリーメントまたは AWS のサービスに関するその他の契約、およびプライバシー通知に同意することになります。このサイトは必須の Cookie を使用します。詳細については、Cookie に関する通知をご参照ください。
始めてとか、サインアウトした場合は下記のログイン画面が出ます。ここではアカウントにハマることもないです。

AWSマネージメントコンソールから、「Lambda」をクリックします。

Lmabda関数の作成
- 「関数の作成」をクリックして、「一から作成」を選び、これから作成する関数名を入力します。"readTemperatureHumidity"としました。

- カスタムロールを作成するので、IAM コンソールに移動します。

-
「Lambda」をクリックしたあと、「次のステップ:アクセス権限」をクリックします。

- lambda_basic_execution を検索します。

-
名前を適当に(わからないので、lambda_basic_execution とした)いれて、「ロールの作成」をクリックします。

-
関数の作成に戻り、「既存のロールを使用する」を選び、既存のロール名に今、作ったlambda_basic_executionをいれ、「関数の作成」をクリックすると、readTemperatureHumidityができます。


- 出てきた関数「readTemperatureHumidity」をクリックします。
この関数のARNをクリップボードにコピーします。

Alexa skillとAWS Lambda関数を関連付けする。
alexa developper consoleに戻る
エンドポイント
左列の「エンドポイント」をクリックすると、「サービスのエンドポイントの種類」が出ます。
- 先ほどLambdaの画面コピーしたARNを、 「デフォルトの地域」に貼り付けます。
- 表示されている「スキルID」をクリップボードにコピーします。

AWS Lambdaに戻る
- リージョンが「東京」になっているのを確認して、トリガーに「Alexa Skills Kit」を選びます。

- トリガー表示の下の"Alexa Skill Kit"と表示されているところに、先ほどalexa developper consoleでコピーした「スキルID」をペーストしてから、「トリガーを追加」をクリックします。
-
トリガーに「Alexa skills Kit」が設定されたことを確認します。

Lambda関数を完成させる
コード編集
「readTemperatureHumidity」クリックして、コードを記述します。関数コードは"Node.js 6.10"です。

コードを編集したら、オレンジ色になっているDeployを押します。未編集だとchanges not Deployedが緑色になっています。
コードはここで編集するよりも、エディタで編集してコピペした方が楽です。
私が作成したLambda関数コード index.js(Node.js 6.10)です。引用元の index.jsを変更しました。クラウド版Blynk(blynk-cloud.com)を使用しています。
'use strict';

/**
 * This sample demonstrates a simple skill built with the Amazon Alexa Skills Kit.
 * The Intent Schema, Custom Slots, and Sample Utterances for this skill, as well as
 * testing instructions are located at http://amzn.to/1LzFrj6
 *
 * For additional samples, visit the Alexa Skills Kit Getting Started guide at
 * http://amzn.to/1LGWsLG
 */

var http = require('http');

// --------------- Helpers that build all of the responses -----------------------

function buildSpeechletResponse(title, output, repromptText, shouldEndSession) {
    return {
        outputSpeech: {
            type: 'PlainText',
            text: output,
        },
        card: {
            type: 'Simple',
            title: "SessionSpeechlet - " + title,
            content: "SessionSpeechlet - " + output,
        },
        reprompt: {
            outputSpeech: {
                type: 'PlainText',
                text: repromptText,
            },
        },
        shouldEndSession: shouldEndSession
    };
}

function buildResponse(sessionAttributes, speechletResponse) {
    return {
        version: '1.0',
        sessionAttributes,
        response: speechletResponse,
    };
}


// --------------- Functions that control the skill's behavior -----------------------

function getWelcomeResponse(callback) {
    // If we wanted to initialize the session to have some attributes we could add those here.
    // セッションを初期化していくつかの属性を持たせたい場合は、それらをここに追加できます。
    const sessionAttributes = {};
    const cardTitle = 'Welcome';
    const speechOutput = "2階の温度を教えてなどと話しかけると、それを答えます。";
    // If the user either does not reply to the welcome message or says something that is not
    // understood, they will be prompted again with this text.
    // ユーザーがウェルカムメッセージに返信しないか、理解できないことを言った場合、このテキストが表示されます。
    const repromptText = "私は温湿度計よっ!あなたの願い事をおっしゃりっ!";
    const shouldEndSession = false;

    callback(sessionAttributes,
        buildSpeechletResponse(cardTitle, speechOutput, repromptText, shouldEndSession));
}

function handleSessionEndRequest(callback) {
    const cardTitle = 'Session Ended';
    const speechOutput = 'Thank you for trying the Alexa Skills Kit sample. Have a nice day!';
    // Setting this to true ends the session and exits the skill.
    const shouldEndSession = true;

    callback({}, buildSpeechletResponse(cardTitle, speechOutput, null, shouldEndSession));
}

function createLocationAttributes(location) {
    return {
        location: location
    };
}

/**
 * Read temperature in the session and prepares the speech to reply to the user.
 */
function readTemperatureInSession(intent, session, callback) {
    const cardTitle = intent.name;
    const LocationSlot = intent.slots.Location;
    const MeasurementSlot = intent.slots.Measurement;
    let repromptText = '';
    let sessionAttributes = {};
    const shouldEndSession = false;
    let speechOutput = '';
	var body = '';
	var blynkAuthToken;
	var blynkPin;

    var location = LocationSlot.value;
    if (location == '' && session.attributes) {
        location = session.attributes.location;
    }
    if (location === '') {
        location = '二階';
    }
    switch (location) {
        case '二階':
            blynkAuthToken = '****_nikaino_BME280_notoken_****'; // 二階のBME280のtoken
            break;
        case '仏間':
            blynkAuthToken = '***_butsumano_BME280_notoken_***'; // 仏間のBME280のtoken
            break;
    }

    var measurement = MeasurementSlot.value;
    if (measurement === '') {
        measurement = '温度';
    }
    switch (measurement) {
        case '何度':
        case '気温':
        case '室温':
        case '温度':
            blynkPin = 'V0';
            break;
        case '湿気':
        case '湿度':
            blynkPin = 'V1';
            break;
        case '大気圧':
        case '気圧':
            blynkPin = 'V2';
            break;
    }

	var httpPromise = new Promise( function(resolve,reject){
		http.get({
			host: 'blynk-cloud.com',
			path: '/' + blynkAuthToken + '/get/' + blynkPin,
			port: '80'
		}, function(response) {
			// Continuously update stream with data
			response.on('data', function(d) {
				body += d;
			});
			response.on('end', function() {
				// Data reception is done, do whatever with it!
				console.log(body);
				resolve('Done Sending');
			});
		});
	});
	httpPromise.then(
		function(data) {
			console.log('Function called succesfully:', data);
			var info = parseFloat(JSON.parse(body));
			if (measurement === '何度' ) {
			speechOutput = location + 'は ' ;
			} else {
			speechOutput = location + 'の ' + measurement + 'は ';
			}
        	repromptText = speechOutput;
			switch (measurement) {
                default:
                case '何度':
                case '気温':
                case '室温':
                case '温度':
        			speechOutput = speechOutput + info.toFixed(1) + '度 です。';
		        	repromptText = repromptText + info.toFixed(1) + '℃です。';
                    break;
                case '湿気':
                case '湿度':
        			speechOutput = speechOutput + info.toFixed(1) + 'パーセント です。';
		        	repromptText = repromptText + info.toFixed(1) + '%です。';
                    break;
                case '大気圧':
                case '気圧':
        			speechOutput = speechOutput + info.toFixed(0) + 'ヘクトパスカル です。';
		        	repromptText = repromptText + info.toFixed(0) + 'hPaです。';
                    break;
			}
			console.log(speechOutput);
			sessionAttributes = createLocationAttributes(location);
			callback(sessionAttributes,buildSpeechletResponse(cardTitle, speechOutput, repromptText, shouldEndSession));
		},
		function(err) {
			console.log('An error occurred:', err);
		}
	);
}

// --------------- Events -----------------------

/**
 * Called when the session starts.
 */
function onSessionStarted(sessionStartedRequest, session) {
    console.log("onSessionStarted requestId=${sessionStartedRequest.requestId}, sessionId=${session.sessionId}");
}

/**
 * Called when the user launches the skill without specifying what they want.
 */
function onLaunch(launchRequest, session, callback) {
    console.log("onLaunch requestId=${launchRequest.requestId}, sessionId=${session.sessionId}");

    // Dispatch to your skill's launch.
    getWelcomeResponse(callback);
}

/**
 * Called when the user specifies an intent for this skill.
 */
function onIntent(intentRequest, session, callback) {
    console.log("onIntent requestId=${intentRequest.requestId}, sessionId=${session.sessionId}");

    const intent = intentRequest.intent;
    const intentName = intentRequest.intent.name;

    // Dispatch to your skill's intent handlers
    if (intentName === 'GetMeasurement') {
        readTemperatureInSession(intent, session, callback);
    } else if (intentName === 'AMAZON.HelpIntent') {
        getWelcomeResponse(callback);
    } else if (intentName === 'AMAZON.StopIntent' || intentName === 'AMAZON.CancelIntent') {
        handleSessionEndRequest(callback);
    } else {
        throw new Error('Invalid intent');
    }
}

/**
 * Called when the user ends the session.
 * Is not called when the skill returns shouldEndSession=true.
 */
function onSessionEnded(sessionEndedRequest, session) {
    console.log("onSessionEnded requestId=${sessionEndedRequest.requestId}, sessionId=${session.sessionId}");
    // Add cleanup logic here
}


// --------------- Main handler -----------------------

// Route the incoming request based on type (LaunchRequest, IntentRequest,
// etc.) The JSON body of the request is provided in the event parameter.
exports.handler = (event, context) => {
    try {
        console.log("event.session.application.applicationId=${event.session.application.applicationId}");

        /**
         * Uncomment this if statement and populate with your skill's application ID to
         * prevent someone else from configuring a skill that sends requests to this function.
         */
        /*
        if (event.session.application.applicationId !== 'amzn1.echo-sdk-ams.app.[unique-value-here]') {
             context.fail("Invalid Application ID");
        }
        */

        if (event.session.new) {
            onSessionStarted({ requestId: event.request.requestId }, event.session);
        }

        if (event.request.type === 'LaunchRequest') {
            onLaunch(event.request,
                event.session,
                function callback(sessionAttributes, speechletResponse) {
					context.succeed(buildResponse(sessionAttributes, speechletResponse));
				});
        } else if (event.request.type === 'IntentRequest') {
            onIntent(event.request,
                event.session,
                function callback(sessionAttributes, speechletResponse) {
					context.succeed(buildResponse(sessionAttributes, speechletResponse));
				});
        } else if (event.request.type === 'SessionEndedRequest') {
            onSessionEnded(event.request, event.session);
            context.succeed();
        }
    } catch (e) {
        context.fail("Exception: " + e);
    }
};
Alexa Skills Kitでテスト
alexa developper consoleに戻る
- 「AWS LambdaのARN」を選択する。
- 「デフォルトの地域(Default Region)」にARNをペーストする。
?「エンドポイントの保存(Save Endpoints)」をクリックします。

- スキル名を確認します。
- 「ビルド(Build)」をクリックし、最初の画面に戻り、4つ全て「オールグリーン」であることを確認します。
- 「テスト(Test)」をクリックします。
スキルをテスト
- マイク利用を「許可する」。 テストを「有効(enabled)」にします。
- マイクアイコンを押下したまま、「アレクサ、温度計を開いて」と話します。 あるいは、マイクアイコンのところ「アレクサ、温度計を開いて」と入力します。これは作成したスキルを呼び出すフレーズです。
- 続いて、Alexaから「この部屋の温度を教えてなどと話しかけると、温度を返します。」というフレーズが返ります。これは、AWS Lambdaで設定したフレーズです。
- 以上のようなやり取りが正しければ、Alexaスキルが正常に動作したことを確認できます。
- うまく動いていないときは、「スキルがリクエストに正しく応答できませんでした。」と返ってきます。

補足:スキルについて
このブログの初めのところで、次のことを書きましたが、
(注記)
Amazon.comに登録されたアカウントで作るスキルは、US向け。日本語表示になっていても、US版のEchoデバイスでしか使えません。したがって、日本版のアレクサアプリには出てきません。
そこで、アレクサアプリやブラウザで開発したスキルを確認する方法です。
Amazon Alexa(日本版;https://alexa.amazon.co.jp/spa/index.html#cards)を開きます。私の場合は、いつの間にかこのようなskillのログが最初に表示されるようになりました。
左列の「スキル」をクリックします。

右上の「有効なスキル」をクリックして、「すべてのスキル」を表示させます。

開発中のスキルが表示されます。開発中=開発者:自分のAlexa echoでしか有効でないプライベートスキルです。Amazonでは「ベータテスト版」と呼んでいます。

ベータテスト版 頭に入れておくポイント
質問: スキルのベータテストツールは無料ですか?はい、スキルのベータテストツールは無料のサービスです。質問: ベータ版の有効期間はどれくらいですか?ベータ版は最長で90日間有効にできます。その時点でベータテストは自動的に終了し、テストが終了したという通知EメールをAmazonが参加者に送信します。90日の期間中は、いつでもベータテストを終了することができます。ただし、延長することはできません。新しいベータテストを作成できますが、その場合、元のテストを作成したときと同じ手順を実行する必要があります。質問: ベータテスターが、スキルとは異なるリージョンやロケールのデバイスを使用することはできますか?スキルが全てのリージョンで使用できる場合、またはベータテスターのデバイスと同じリージョンやロケールで使用できる場合は、スキルを使用できます。ベータテスターがスキルとは異なるリージョンやロケールのデバイスを使用してる場合、スキルを使用できません。


